 admin1
 Honey Chicken
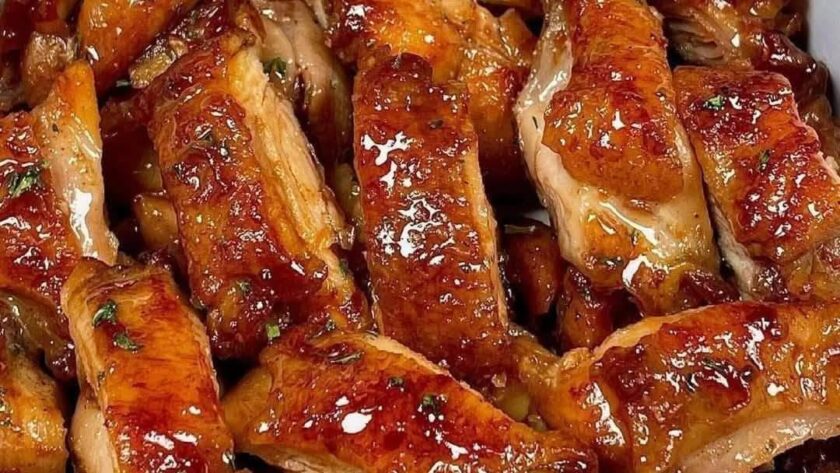
Honey Chicken is a delicious combination of crispy, juicy chicken coated in a glossy sauce that perfectly balances sweet honey, savory soy sauce, aromatic garlic, and a hint of tanginess. It is a popular takeout favorite that is surprisingly easy to prepare at home using simple pantry ingredients. The chicken develops a beautifully crisp exterior while remaining tender and moist inside, and the sticky honey glaze clings to every piece for maximum flavor.
This homemade version allows you to control the sweetness, saltiness, and spice level while avoiding unnecessary additives often found in restaurant versions. Serve it over steamed rice, fried rice, noodles, or alongside fresh vegetables for a complete and satisfying meal that the entire family will enjoy.
Preparation Time
Preparation Time: 20 minutes
Marinating Time: 20–30 minutes
Cooking Time: 20 minutes
Total Time: About 1 hour
Servings: 4–6
Difficulty Level: Easy
Ingredients
For the Chicken
700 grams boneless skinless chicken thighs or chicken breast, cut into bite-sized pieces
1 teaspoon salt
½ teaspoon black pepper
1 teaspoon garlic powder
1 teaspoon onion powder
1 teaspoon paprika
2 eggs
1 cup all-purpose flour
½ cup cornstarch
1 teaspoon baking powder
Vegetable oil for frying
For the Honey Sauce
½ cup honey
¼ cup soy sauce
2 tablespoons ketchup
1 tablespoon rice vinegar or apple cider vinegar
3 cloves garlic, finely minced
1 teaspoon grated fresh ginger
1 tablespoon brown sugar
1 teaspoon sesame oil
½ teaspoon crushed red chili flakes, optional
2 teaspoons cornstarch
3 tablespoons water
For Garnish
Sesame seeds
Thinly sliced green onions
Fresh chopped parsley if desired
Kitchen Equipment
Large mixing bowls
Whisk
Measuring cups and spoons
Deep frying pan or Dutch oven
Tongs
Wire rack or paper towel-lined plate
Small saucepan
Wooden spoon
Serving platter
Preparing the Chicken
Wash the chicken if preferred and pat it completely dry using paper towels. Removing excess moisture helps the coating stick better and creates a crispier finish.
Cut the chicken into evenly sized pieces so they cook at the same rate.
Place the chicken into a large bowl.
Season with salt, black pepper, garlic powder, onion powder, and paprika.
Add the eggs and mix thoroughly until every piece is evenly coated.
In another bowl combine the flour, cornstarch, and baking powder.
Add the dry mixture to the chicken and gently toss until every piece is fully coated. The coating should cling well without being too thick.
Allow the coated chicken to rest for about 10 minutes. This resting period helps the coating adhere and reduces the chance of it falling off during frying.
Preparing the Honey Sauce
In a small saucepan combine the honey, soy sauce, ketchup, vinegar, garlic, ginger, brown sugar, sesame oil, and chili flakes if using.
Place over medium heat and stir continuously until the ingredients blend together.
Mix the cornstarch with water until completely smooth.
Slowly pour the cornstarch mixture into the simmering sauce while stirring constantly.
Continue cooking for about 2 to 3 minutes until the sauce thickens into a smooth, glossy glaze.
Remove from the heat and set aside.
Frying the Chicken
Heat about 2 inches of vegetable oil in a deep pan to approximately 175°C.
Carefully place the coated chicken pieces into the hot oil in small batches. Avoid overcrowding because it lowers the oil temperature and prevents proper crisping.
Cook each batch for about 5 to 7 minutes, turning occasionally until the chicken is golden brown, crispy, and fully cooked.
Transfer the cooked chicken to a wire rack or paper towels to drain excess oil.
For an extra crispy texture, allow the chicken to rest for 5 minutes, then fry it a second time for 1 to 2 minutes until deeply golden and exceptionally crunchy.
Repeat until all the chicken has been cooked.
Combining the Chicken and Sauce
Warm the honey sauce gently if it has cooled.
Place the crispy chicken into a large mixing bowl.
Pour the warm sauce over the chicken.
Gently toss until every piece is evenly coated with the sticky glaze.
Work quickly so the chicken remains crisp while absorbing just enough sauce.
Transfer immediately to a serving dish.
Sprinkle generously with sesame seeds and sliced green onions.
Serve while hot.
Serving Suggestions
Honey Chicken is extremely versatile and pairs beautifully with many side dishes.
Serve it over fluffy steamed jasmine rice for a classic meal.
Pair it with vegetable fried rice for extra flavor.
Serve alongside garlic noodles or lo mein.
Add steamed broccoli, carrots, snap peas, or bell peppers for a colorful dinner.
Wrap leftovers in warm tortillas with lettuce for a delicious lunch.
Use as a topping for rice bowls with avocado, cucumber, and shredded cabbage.
Serve with fresh salad for a lighter option.
Tips for Success
Chicken thighs remain juicier than chicken breast, although both work well.
Pat the chicken dry before seasoning to help the coating adhere.
Cornstarch is essential for achieving a light, crispy crust.
Double frying produces restaurant-quality crispiness.
Do not overcrowd the frying pan.
Keep the oil temperature consistent throughout frying.
Cook the sauce only until thickened to preserve the honey’s natural flavor.
Add the sauce just before serving to maintain crispness.
Taste the sauce before coating the chicken and adjust sweetness or saltiness if needed.
Fresh garlic and ginger provide significantly better flavor than powdered versions.
Flavor Variations
Add orange zest and fresh orange juice for Honey Orange Chicken.
Mix in extra chili flakes or hot sauce for a spicy version.
Include pineapple chunks for a tropical twist.
Stir in toasted sesame seeds for a nuttier flavor.
Add sautéed bell peppers and onions for additional texture.
Use maple syrup instead of part of the honey for a deeper sweetness.
Mix a little Dijon mustard into the sauce for a sweet and tangy variation.
Add freshly cracked black pepper for a peppery finish.
Storage
Allow the Honey Chicken to cool completely before storing.
Refrigerate in an airtight container for up to 4 days.
Store the sauce separately whenever possible to preserve the chicken’s crisp texture.
Freeze cooked chicken without the sauce for up to 2 months.
Freeze the sauce separately in a sealed container.
Thaw overnight in the refrigerator before reheating.
Reheating
Reheat the chicken in an oven at 190°C for about 10 to 15 minutes until hot and crispy.
An air fryer also works well, heating the chicken for about 4 to 6 minutes.
Warm the sauce separately in a saucepan over low heat.
Combine the hot chicken with the warm sauce just before serving.
Avoid microwaving if possible, as it softens the crispy coating.
Nutritional Information
The nutritional values are approximate and depend on ingredient brands and serving sizes.
Calories: 520–580 per serving
Protein: 32 grams
Carbohydrates: 38 grams
Fat: 26 grams
Fiber: 1 gram
Sugar: 21 grams
Sodium: 780 milligrams
Frequently Asked Questions
Can I bake the chicken instead of frying?
Yes. Bake the coated chicken at 220°C for about 25 to 30 minutes, turning halfway through, until golden and fully cooked. The texture will be lighter but still delicious.
Can I use an air fryer?
Yes. Lightly spray the coated chicken with oil and cook at 200°C for 12 to 16 minutes, shaking the basket halfway through cooking.
Can I make the sauce ahead of time?
Yes. The sauce can be prepared up to three days in advance and refrigerated. Warm it gently before using.
How do I keep the chicken crispy?
Coat the chicken with the sauce immediately before serving rather than letting it sit for a long period.
Can I add vegetables?
Absolutely. Broccoli, carrots, bell peppers, snap peas, mushrooms, and zucchini all pair wonderfully with the honey glaze.
Honey Chicken is a comforting homemade favorite that combines crispy golden chicken with a rich, glossy honey sauce bursting with sweet, savory, and aromatic flavors. Whether served for a weeknight family dinner or as the centerpiece of a special gathering, this recipe delivers restaurant-quality results with simple ingredients and easy techniques. Each bite offers the perfect balance of crunch, tenderness, and sticky honey goodness, making it a meal that everyone will request again and again.