admin1
 Air Fryer Bread Recipe
There is something incredibly satisfying about baking a loaf of fresh bread at home. The comforting aroma that fills the kitchen, the golden crust, and the soft, fluffy interior make homemade bread one of life’s simple pleasures. While traditional oven-baked bread is wonderful, using an air fryer is a fantastic alternative, especially when you don’t want to heat up your entire kitchen or if you’re making a smaller loaf.
Air fryer bread is soft on the inside, beautifully browned on the outside, and surprisingly easy to prepare. Whether you’re a beginner baker or someone who has made countless loaves before, this recipe is simple enough to follow while delivering bakery-quality results. The air fryer circulates hot air evenly around the dough, creating a crisp crust while keeping the center light and tender.
This bread is incredibly versatile. Enjoy it warm with butter, use it for sandwiches, toast it for breakfast, or serve it alongside soups, stews, pasta dishes, or salads. Once you make your own homemade air fryer bread, you’ll discover just how delicious fresh bread can be.
Why You’ll Love This Recipe
This bread has a soft, fluffy crumb that stays moist for days.
The crust develops a beautiful golden color with a slight crispness.
It requires only a handful of pantry ingredients.
The recipe is beginner-friendly and easy to customize.
The air fryer cooks the bread faster than many conventional ovens.
Perfect for small households that don’t need a large loaf.
Ideal for sandwiches, toast, garlic bread, or dinner rolls.
The ingredients are affordable and easy to find.
The bread slices beautifully once cooled.
You can easily add herbs, cheese, seeds, or spices for different flavors.
Ingredients
3 cups all-purpose flour
2¼ teaspoons instant yeast
1 tablespoon granulated sugar
1 teaspoon salt
1 tablespoon olive oil or melted butter
1 cup warm water, about 105°F to 110°F (40°C to 43°C)
Extra flour for dusting
Butter for brushing after baking (optional)
Understanding the Ingredients
Flour provides the structure of the bread. All-purpose flour creates a soft loaf, while bread flour gives a slightly chewier texture.
Yeast is responsible for making the bread rise. Instant yeast mixes directly into the flour without proofing.
Sugar feeds the yeast during fermentation and also enhances flavor and browning.
Salt strengthens the dough while balancing the overall taste.
Olive oil or butter keeps the crumb soft and tender while adding richness.
Warm water activates the yeast and hydrates the flour. Water that is too hot may kill the yeast, while water that is too cold will slow the rising process.
Equipment You’ll Need
Air fryer
Mixing bowl
Wooden spoon or silicone spatula
Measuring cups and spoons
Kitchen towel
Small round baking pan or cake pan that fits inside your air fryer basket
Cooling rack
Step 1: Mix the Dough
In a large mixing bowl, combine the flour, instant yeast, sugar, and salt. Stir well so the dry ingredients are evenly distributed.
Add the warm water along with the olive oil.
Mix until a rough dough forms. The dough will initially appear slightly sticky, but this is perfectly normal.
Step 2: Knead the Dough
Transfer the dough onto a lightly floured surface.
Knead for about 8 to 10 minutes until the dough becomes smooth, soft, and elastic.
If the dough sticks excessively, sprinkle in a little flour, but avoid adding too much because soft dough creates softer bread.
You can also knead the dough using a stand mixer fitted with a dough hook for about 6 to 7 minutes.
The finished dough should feel smooth and spring back gently when pressed.
Step 3: First Rise
Shape the dough into a smooth ball.
Place it into a lightly greased bowl.
Cover with a clean kitchen towel or plastic wrap.
Allow the dough to rise in a warm place for approximately 60 to 90 minutes, or until doubled in size.
The exact time depends on the room temperature.
Step 4: Shape the Dough
Once doubled, gently punch down the dough to release excess air.
Shape it into a smooth round loaf.
Grease a small baking pan that fits comfortably inside your air fryer basket.
Place the shaped dough inside the pan.
Cover again and allow the dough to rise for another 30 to 40 minutes until noticeably puffy.
Step 5: Prepare the Air Fryer
Preheat the air fryer to 320°F (160°C) for about 5 minutes.
Preheating ensures even cooking and proper oven spring.
Step 6: Bake the Bread
Place the baking pan into the preheated air fryer basket.
Bake at 320°F (160°C) for 20 to 25 minutes.
Check the bread after about 15 minutes.
If the top is browning too quickly, loosely cover it with a piece of aluminum foil for the remaining cooking time.
The bread is fully baked when the crust is golden brown and the loaf sounds hollow when tapped.
An instant-read thermometer inserted into the center should read approximately 190°F to 200°F (88°C to 93°C).
Step 7: Cool the Bread
Remove the bread from the air fryer.
Carefully lift it from the pan.
Place it on a cooling rack.
Brush the top with melted butter while still warm if desired.
Allow the bread to cool completely before slicing.
Although it may be tempting to cut into it immediately, cooling allows the crumb to finish setting and results in cleaner slices.
Texture and Flavor
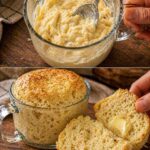
This air fryer bread has a wonderfully soft interior with small, even air pockets throughout. The crust is lightly crisp when freshly baked but softens slightly as the bread cools. The flavor is mild, buttery, and slightly sweet, making it suitable for both savory and sweet toppings.
Serving Suggestions
Serve warm with butter and homemade jam.
Toast slices for breakfast.
Use for grilled cheese sandwiches.
Make delicious French toast.
Serve alongside soups or chili.
Pair with pasta dishes.
Use for homemade garlic bread.
Slice for deli sandwiches.
Top with avocado and eggs.
Enjoy with honey and cinnamon.
Recipe Variations
For herb bread, add one tablespoon of dried Italian herbs to the flour mixture.
For cheesy bread, fold in one cup of shredded cheddar or mozzarella.
For garlic bread, mix garlic powder into the dough and brush with garlic butter after baking.
For whole wheat bread, replace one cup of all-purpose flour with whole wheat flour.
For seeded bread, sprinkle sesame, sunflower, flax, or pumpkin seeds over the loaf before baking.
For rosemary bread, knead fresh chopped rosemary into the dough.
For onion bread, mix in caramelized onions after kneading.
For sweet bread, add raisins, cinnamon, and a little extra sugar.
Tips for Success
Measure flour accurately using the spoon-and-level method.
Always use fresh yeast.
Do not use water that is too hot.
Knead until the dough becomes elastic.
Allow enough time for both rises.
Do not overcrowd the air fryer.
Use a baking pan that allows room for the bread to expand.
Cover with foil if browning too quickly.
Allow the bread to cool before slicing.
Store properly to maintain freshness.
Common Mistakes to Avoid
Adding too much flour creates dense bread.
Skipping the second rise reduces volume.
Using expired yeast prevents proper rising.
Cutting the bread while it’s still hot creates a gummy texture.
Cooking at excessively high temperatures can brown the outside before the inside is fully baked.
Removing the bread too early leaves the center undercooked.
Storage Instructions
Store the cooled bread in an airtight container or bread bag at room temperature for up to three days.
For longer storage, refrigerate for up to one week, although refrigeration may slightly dry the bread.
For the best long-term storage, wrap individual slices tightly and freeze for up to three months. Thaw at room temperature or toast directly from frozen.
Reheating
Warm slices in the air fryer at 300°F (150°C) for 2 to 3 minutes.
Toast slices in a toaster until lightly crisp.
Microwave individual slices for about 10 to 15 seconds if you prefer softer bread.
Nutritional Information
Servings: 10
Calories: Approximately 170 per serving
Protein: 5 grams
Carbohydrates: 32 grams
Fat: 3 grams
Fiber: 1 gram
Sugar: 1 gram
Sodium: 230 milligrams
Nutritional values are approximate and may vary depending on the specific ingredients used.
Frequently Asked Questions
Can I use bread flour instead of all-purpose flour?
Yes. Bread flour produces a slightly chewier loaf with a stronger structure.
Can I make this bread without oil?
Yes, although the bread may be slightly less tender. Oil contributes to softness and extends freshness.
Why didn’t my bread rise?
Old yeast, cold water, or a chilly kitchen can all prevent proper rising. Always check that your yeast is active and give the dough enough time in a warm environment.
Can I add cheese or herbs?
Absolutely. This dough is an excellent base for countless flavor variations including herbs, spices, cheese, olives, roasted garlic, and seeds.
Can I double the recipe?
Yes, but it is best to divide the dough into two smaller loaves rather than trying to bake one large loaf in the air fryer.
How do I know when the bread is fully cooked?
The crust should be golden brown, the loaf should sound hollow when tapped, and the internal temperature should reach approximately 190°F to 200°F.
Freshly baked air fryer bread is proof that you don’t need a traditional oven to enjoy homemade bread. With its soft, fluffy interior, beautifully golden crust, and simple ingredients, this recipe is perfect for everyday baking. Whether served with breakfast, lunch, dinner, or enjoyed as a warm snack with butter, this bread delivers incredible flavor and texture while being easy enough for bakers of any skill level. Once you’ve mastered this basic recipe, you can customize it with your favorite herbs, cheeses, seeds, or spices to create endless delicious variations that your family will request again and again.