 admin1
 Fluffy and Soft Gluten-Free Bread Recipe
Gluten-free bread can sometimes be challenging because traditional wheat bread gets its softness, stretch, and airy texture from gluten. This recipe is specially designed to create a loaf that is light, fluffy, tender, and satisfying without using wheat flour. The combination of gluten-free flours, starches, eggs, and carefully balanced moisture creates a bread that slices beautifully, works well for sandwiches, and tastes much closer to classic homemade bread.
This gluten-free bread has a soft interior, a delicate golden crust, and a pleasant flavor. It is perfect for breakfast toast, sandwiches, French toast, or simply enjoying warm with butter.
About This Gluten-Free Bread
This bread recipe focuses on achieving the texture that many gluten-free breads lack. Instead of producing a dense or crumbly loaf, the ingredients work together to create a moist and airy structure.
The secret is using a combination of gluten-free flour and starch. Gluten-free flours provide flavor and nutrients, while starches help create a lighter texture. Xanthan gum or psyllium husk helps replace some of the elasticity normally provided by gluten, allowing the bread to hold together properly.
The result is a homemade gluten-free loaf that is soft, fluffy, and easy to slice.
Preparation Time
Preparation time: 20 minutes
Rising time: 1 to 1½ hours
Baking time: 40 to 50 minutes
Total time: About 2½ hours
Servings: 10 to 12 slices
Ingredients
For the Gluten-Free Flour Mixture
1½ cups gluten-free all-purpose flour blend
1 cup tapioca starch or tapioca flour
½ cup potato starch or cornstarch
¼ cup almond flour
2 tablespoons psyllium husk powder or 1½ teaspoons xanthan gum
For the Bread Dough
2¼ teaspoons active dry yeast
1 tablespoon honey or sugar
1 cup warm milk or unsweetened dairy-free milk
½ cup warm water
2 large eggs, room temperature
3 tablespoons olive oil or melted butter
1 teaspoon apple cider vinegar
1½ teaspoons salt
1 teaspoon baking powder
1 teaspoon sugar (optional, for yeast activation)
Equipment Needed
Large mixing bowl
Small bowl for activating yeast
Electric mixer or wooden spoon
9×5 inch loaf pan
Parchment paper
Kitchen towel
Wire cooling rack
Step-by-Step Instructions
Prepare the Yeast Mixture
Start by warming the milk and water until they are slightly warm to the touch. The liquid should not be hot because high temperatures can kill the yeast.
Pour the warm liquid into a small bowl. Add the yeast and honey or sugar. Stir gently and allow it to sit for 5 to 10 minutes until it becomes foamy.
A foamy yeast mixture shows that the yeast is active and ready to help the bread rise.
Prepare the Dry Ingredients
In a large mixing bowl, combine the gluten-free flour blend, tapioca starch, potato starch, almond flour, psyllium husk powder or xanthan gum, salt, and baking powder.
Whisk the ingredients well so the starches and binders are evenly distributed throughout the flour mixture.
This step is important because gluten-free ingredients need to be mixed thoroughly to create an even texture.
Mix the Wet Ingredients
In another bowl, add the eggs, olive oil or melted butter, and apple cider vinegar.
Whisk until the mixture is smooth.
Add the activated yeast mixture and stir gently.
Combine the Dough
Slowly add the wet ingredients to the dry ingredients.
Mix thoroughly using an electric mixer for 3 to 5 minutes or stir strongly with a wooden spoon until everything is combined.
Gluten-free bread dough does not look like traditional bread dough. It will be thicker than cake batter but softer and stickier than wheat bread dough.
Do not add extra flour because this can make the bread dry and heavy.
Allow the Dough to Rise
Prepare a loaf pan by lining it with parchment paper or lightly greasing it.
Transfer the dough into the pan and smooth the top with a wet spatula.
Cover the pan loosely with a clean kitchen towel.
Place it in a warm area and allow it to rise for about 1 to 1½ hours.
The dough should increase in size and look airy. Do not let it rise too long because gluten-free bread can collapse if over-proofed.
Bake the Bread
Preheat your oven to 350°F (175°C).
Place the risen dough in the oven and bake for 40 to 50 minutes.
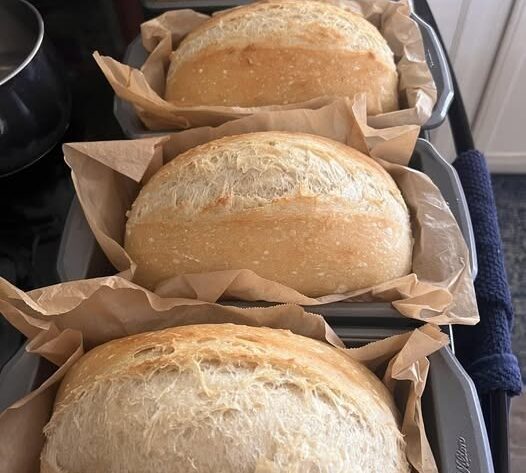
The top should become golden brown, and the bread should feel firm when gently tapped.
If the top browns too quickly, cover it loosely with foil during the last part of baking.
Cool Before Slicing
Remove the bread from the oven and allow it to cool in the pan for about 10 minutes.
Then transfer it to a wire rack and let it cool completely before slicing.
Cutting gluten-free bread while it is still warm can make the inside gummy or sticky.
Tips for Making the Softest Gluten-Free Bread
Use room-temperature ingredients because they mix more evenly and help the yeast work properly.
Do not skip the psyllium husk or xanthan gum because these ingredients help create structure and prevent the bread from falling apart.
Measure gluten-free flour carefully. Too much flour can make the loaf dense.
Allow enough rising time but avoid over-proofing.
Let the bread cool completely before cutting for the best texture.
Store the bread properly to maintain softness.
How to Store Gluten-Free Bread
At room temperature, keep the bread in an airtight container or wrapped tightly for up to 3 days.
For longer storage, slice the bread and freeze it in a freezer-safe bag for up to 3 months.
Frozen slices can be toasted directly from the freezer whenever needed.
How to Make This Bread Dairy-Free
Replace regular milk with almond milk, oat milk labeled gluten-free, coconut milk, or another dairy-free alternative.
Use olive oil instead of butter.
The texture will remain soft and delicious.
How to Make This Bread Egg-Free
Eggs help provide structure and softness, but you can make an egg-free version.
Replace each egg with one tablespoon ground flaxseed mixed with three tablespoons water.
Allow the mixture to sit for several minutes until it becomes thick.
The bread may be slightly denser but will still be enjoyable.
Flavor Variations
Garlic Herb Gluten-Free Bread
Add minced garlic, dried oregano, basil, and rosemary to the dough for a savory bread perfect with soups and pasta dishes.
Sweet Cinnamon Gluten-Free Bread
Add cinnamon, a little extra honey, and raisins for a lightly sweet breakfast bread.
Seeded Gluten-Free Bread
Mix sunflower seeds, pumpkin seeds, sesame seeds, or chia seeds into the dough for extra texture and nutrition.
Cheesy Gluten-Free Bread
Add shredded cheddar, mozzarella, or parmesan cheese before baking for a flavorful cheesy loaf.
Serving Ideas
This soft gluten-free bread can be enjoyed in many ways.
Serve toasted with butter and jam for breakfast.
Use it for sandwiches with vegetables, cheese, chicken, or eggs.
Make delicious gluten-free French toast.
Serve alongside soups, stews, and salads.
Use slices for avocado toast.
Enjoy warm bread with olive oil and herbs.
Common Problems and Solutions
Why is my gluten-free bread dense?
Dense bread usually happens because of too much flour, not enough liquid, inactive yeast, or insufficient rising time.
Make sure your yeast is fresh and your dough has enough moisture.
Why did my bread collapse?
Bread can collapse if it rises too much before baking or if there is not enough structure from binders like psyllium husk or xanthan gum.
Avoid letting the dough rise excessively.
Why is my bread gummy inside?
Gluten-free bread needs more cooling time than regular bread.
Always wait until the loaf is completely cool before slicing.
Can I use only one gluten-free flour?
Using only one flour usually creates a less balanced texture. A combination of gluten-free flours and starches creates a much softer and more bread-like result.
Nutrition Information (Approximate Per Slice)
Calories: 170–200
Carbohydrates: 30 grams
Protein: 4–5 grams
Fat: 5–7 grams
Fiber: 3 grams
Nutrition values may vary depending on the exact ingredients used.
Final Thoughts
This fluffy and soft gluten-free bread recipe proves that gluten-free baking can create delicious results. With the right combination of ingredients and proper preparation, you can enjoy homemade bread that is light, tender, and perfect for everyday meals.
Whether you follow a gluten-free lifestyle or simply want to try a healthier homemade loaf, this recipe gives you a reliable bread that the whole family can enjoy.