 admin1
 No-Bake Chocolate Peanut Butter Crunch Bars
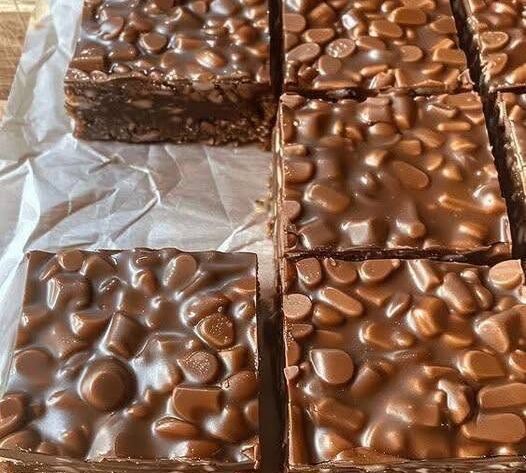
No-Bake Chocolate Peanut Butter Crunch Bars are a delicious combination of rich chocolate, creamy peanut butter, crispy cereal, and a buttery cookie crust. These bars are perfect for anyone who loves classic chocolate and peanut butter desserts but doesn’t want to turn on the oven. They are easy to prepare, require only a handful of pantry ingredients, and can be made well in advance for parties, holidays, potlucks, bake sales, or simply to satisfy a sweet craving at home.
The beauty of these bars lies in their contrasting textures. The smooth peanut butter filling is creamy and melts in your mouth, while the crispy cereal adds a satisfying crunch. The silky chocolate topping completes the dessert with a glossy finish that makes every bite irresistible. Since the bars are chilled rather than baked, they retain a fresh, rich flavor that many people find even more enjoyable than traditional baked desserts.
Why You’ll Love This Recipe
This recipe is simple enough for beginners yet impressive enough to serve to guests. There is no need for special baking skills, complicated equipment, or advanced techniques. Everything comes together with basic mixing and chilling.
These bars are wonderfully rich without being overly sweet. The peanut butter balances the chocolate perfectly, while the crunchy cereal keeps the filling light and prevents it from becoming too dense.
Because they are served chilled, they are ideal for warm weather when you don’t want to heat up your kitchen. They also travel well and can easily be cut into squares for serving at events.
The recipe is highly adaptable. You can make it gluten-free, use dark chocolate instead of milk chocolate, or add chopped nuts for extra texture. Every batch can be customized according to your family’s preferences.
Preparation Time
Preparation Time: 30 minutes
Chilling Time: 3 hours
Total Time: About 3 hours 30 minutes
Servings: 16 to 20 bars
Ingredients
For the Cookie Base
2½ cups crushed graham crackers or digestive biscuits
½ cup unsalted butter, melted
¼ cup light brown sugar
1 teaspoon vanilla extract
Pinch of salt
For the Peanut Butter Crunch Filling
1½ cups creamy peanut butter
½ cup unsalted butter
1 cup powdered sugar
1 teaspoon vanilla extract
Pinch of salt
3 cups crispy rice cereal
½ cup finely chopped roasted peanuts (optional)
For the Chocolate Topping
2 cups semi-sweet chocolate chips
2 tablespoons creamy peanut butter
2 tablespoons butter
1 teaspoon vanilla extract
Pinch of sea salt for garnish (optional)
Equipment Needed
9×13-inch baking pan
Mixing bowls
Medium saucepan
Rubber spatula
Measuring cups and spoons
Parchment paper
Offset spatula or spoon
Sharp knife
Step 1: Prepare the Pan
Line a 9×13-inch baking pan with parchment paper, leaving enough overhang on the sides to lift the bars out later. Lightly grease the parchment if desired. This makes removing and slicing the bars much easier.
Step 2: Make the Cookie Base
In a medium mixing bowl, combine the crushed graham crackers, melted butter, brown sugar, vanilla extract, and salt.
Mix thoroughly until every crumb is coated with butter. The mixture should resemble wet sand and hold together when pressed.
Transfer the crumb mixture into the prepared pan.
Use the back of a spoon or the bottom of a measuring cup to press it into an even, compact layer.
Place the pan in the refrigerator while preparing the filling.
Step 3: Prepare the Peanut Butter Mixture
In a saucepan over low heat, melt the butter.
Add the peanut butter and stir continuously until smooth.
Remove from the heat.
Stir in the vanilla extract, powdered sugar, and salt.
Mix until the sugar is completely incorporated and the mixture becomes smooth and creamy.
Avoid overheating the peanut butter because excessive heat may cause the oils to separate.
Step 4: Add the Crunch
Pour the crispy rice cereal into a large mixing bowl.
If using chopped peanuts, add them now.
Pour the warm peanut butter mixture over the cereal.
Fold gently using a rubber spatula until every piece of cereal is evenly coated.
Work carefully so the cereal stays crisp and doesn’t become crushed.
The mixture should be evenly coated while still maintaining plenty of crunch.
Step 5: Assemble the Filling
Remove the chilled crust from the refrigerator.
Spread the peanut butter crunch mixture evenly over the cookie base.
Press gently into an even layer without crushing the cereal too much.
Smooth the top using an offset spatula.
Return the pan to the refrigerator while preparing the chocolate topping.
Step 6: Make the Chocolate Layer
Place the chocolate chips, peanut butter, and butter into a heatproof bowl.
Melt using either short intervals in the microwave or over a pan of gently simmering water.
Stir after each interval until perfectly smooth.
Add the vanilla extract.
Continue stirring until glossy and silky.
The chocolate should pour easily but not be overly hot.
Step 7: Add the Chocolate Topping
Pour the melted chocolate over the peanut butter layer.
Spread evenly using an offset spatula.
Tap the pan gently on the counter to remove any air bubbles and create a smooth finish.
If desired, sprinkle a tiny amount of flaky sea salt over the chocolate before it sets.
Step 8: Chill
Refrigerate the bars for at least three hours.
For even cleaner slices, chill them overnight.
The chocolate should be fully firm before cutting.
Step 9: Slice and Serve
Lift the bars from the pan using the parchment paper.
Allow them to sit at room temperature for about 10 minutes before slicing.
Using a large sharp knife, cut into squares or rectangles.
Wipe the knife clean between cuts for perfectly neat edges.
Serve chilled or slightly softened at room temperature.
Tips for Perfect No-Bake Bars
Always use good-quality chocolate because it forms the top layer and greatly affects the final flavor.
Creamy peanut butter provides the smoothest filling, while natural peanut butter may separate and produce a softer texture.
Press the crust firmly so it holds together when sliced.
Avoid packing the cereal mixture too tightly or the bars may become overly dense.
Allow enough chilling time before slicing.
A warm knife creates smoother cuts through the chocolate layer.
Store the bars in a single layer whenever possible to maintain their appearance.
Delicious Variations
Replace the graham cracker crust with crushed chocolate cookies for an even richer dessert.
Use dark chocolate instead of semi-sweet chocolate for a deeper cocoa flavor.
Mix mini marshmallows into the cereal layer for extra sweetness.
Add chopped pretzels for a salty crunch.
Use crunchy peanut butter instead of creamy peanut butter for additional texture.
Swirl melted white chocolate over the dark chocolate before chilling.
Add toasted coconut flakes to the filling.
Stir mini chocolate chips into the peanut butter mixture after it cools slightly.
Replace rice cereal with cornflakes for a different crunchy texture.
Add chopped almonds, pecans, walnuts, or cashews for a nutty variation.
Flavor the filling with a pinch of cinnamon or espresso powder for extra depth.
Storage Instructions
Store the bars in an airtight container in the refrigerator for up to one week.
Separate layers with parchment paper to prevent sticking.
For longer storage, freeze the bars individually wrapped in plastic wrap and placed in a freezer-safe container for up to three months.
Thaw overnight in the refrigerator before serving.
These bars are delicious served straight from the refrigerator or after resting at room temperature for several minutes.
Serving Suggestions
Serve with a glass of cold milk for a classic pairing.
Enjoy alongside hot coffee or espresso for an afternoon treat.
Pair with vanilla ice cream for a decadent dessert.
Cut into bite-sized squares for dessert platters.
Serve with fresh strawberries, raspberries, or sliced bananas for a fruity contrast.
Pack into lunchboxes for a special homemade dessert.
Arrange on holiday cookie trays for a beautiful no-bake addition.
Common Mistakes to Avoid
Using too much butter in the crust can make it greasy.
Not pressing the crust firmly may cause it to crumble.
Overheating the chocolate can make it thick and difficult to spread.
Skipping the chilling time will result in bars that fall apart when cut.
Using stale cereal will reduce the signature crunch.
Adding the cereal while the peanut butter mixture is extremely hot may soften it too much.
Cutting the bars before the chocolate has fully hardened can create messy slices.
Frequently Asked Questions
Can I make these bars ahead of time?
Yes. They actually taste even better after chilling overnight, making them an excellent make-ahead dessert.
Can I freeze them?
Absolutely. Freeze them for up to three months in an airtight container. Thaw in the refrigerator before serving.
Can I use natural peanut butter?
You can, but thoroughly stir it first. The texture may be softer because natural peanut butter contains more oil.
Can I use milk chocolate?
Yes. Milk chocolate creates a sweeter topping, while dark chocolate produces a richer and less sweet finish.
How do I keep the chocolate from cracking when slicing?
Allow the bars to sit at room temperature for 10 to 15 minutes before cutting, and use a sharp knife warmed under hot water and dried before each slice.
Can I make these gluten-free?
Yes. Simply use certified gluten-free cookies or graham crackers and gluten-free crispy rice cereal.
Final Thoughts
No-Bake Chocolate Peanut Butter Crunch Bars are one of those timeless desserts that combine simple ingredients into something truly special. Every layer contributes its own flavor and texture, from the buttery cookie crust to the creamy peanut butter filling, the crispy cereal crunch, and the smooth chocolate topping. They require no baking, making them convenient for busy schedules and warm weather, yet they deliver bakery-quality results with very little effort.
Whether you’re preparing them for a family gathering, holiday celebration, picnic, birthday party, or simply keeping a batch in the refrigerator for whenever a sweet craving strikes, these bars are sure to become a favorite. Rich, creamy, crunchy, and deeply satisfying, they are a dessert that everyone will request again and again.