🍓 Protein-Packed Berry Cloud Cups
Light, fluffy “cloud-like” dessert cups layered with creamy protein mousse, whipped yogurt, and juicy berries. High-protein, low-guilt, and perfect as a snack, dessert, or post-workout treat.
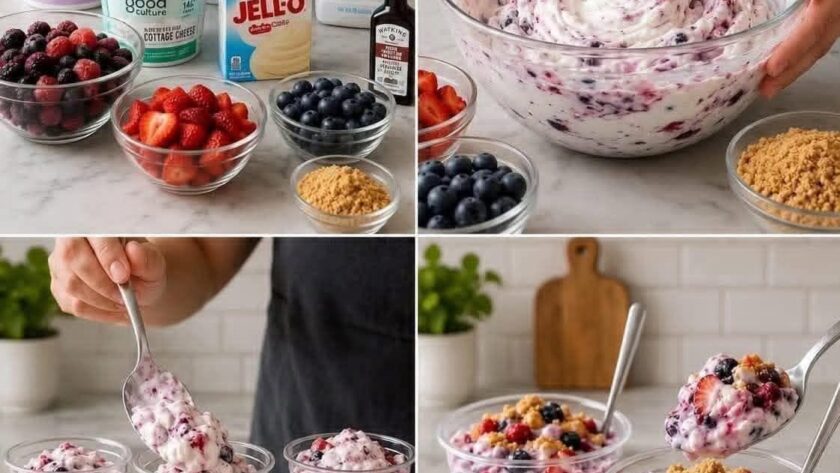
🛒 Ingredients (Makes 4 large cups or 6 small cups)
🍶 Protein Cloud Cream Layer
- 1 cup (240g) Greek yogurt (thick, unsweetened)
- 1 scoop (25–35g) vanilla or berry protein powder
- 2–3 tbsp honey or maple syrup (adjust to taste)
- 1/2 tsp vanilla extract
- 2–4 tbsp milk (to adjust texture)
- Pinch of salt
☁️ Whipped “Cloud” Layer
- 1/2 cup heavy cream (cold)
- 2 tbsp powdered sugar (optional)
- 1/2 tsp vanilla extract
🍓 Berry Layer
- 1 cup strawberries (chopped)
- 1/2 cup blueberries
- 1/2 cup raspberries
- 1–2 tbsp honey or lemon juice (optional for brightness)
🥣 Optional Crunch Layer (recommended)
- 1/2 cup granola
- OR crushed digestive biscuits
- OR crushed protein cookies
💪 Extra Protein Boost (optional)
- 2–3 tbsp cottage cheese (blended smooth)
- OR 1/2 scoop extra protein powder
🍳 Equipment Needed
- Mixing bowls (2–3)
- Electric hand mixer or whisk
- Spoon or spatula
- Serving cups or jars
- Blender (optional for smoother texture)
🧁 Step-by-Step Instructions
🥣 Step 1: Prepare the Berry Layer
- Wash all berries thoroughly.
- Slice strawberries into small chunks.
- Add berries into a bowl.
- Mix gently with:
- 1–2 tbsp honey OR lemon juice
- Let sit for 10–15 minutes.
👉 This creates a natural berry syrup (juicy and sweet).
🍶 Step 2: Make Protein Cloud Cream
- In a bowl, add Greek yogurt.
- Add protein powder gradually while mixing.
- Add vanilla extract and honey.
- Pour milk slowly until smooth and fluffy.
👉 Texture goal: thick but spoonable, like cheesecake batter.
If too thick → add milk
If too thin → add more yogurt or protein powder
☁️ Step 3: Make the Whipped Cloud Layer
- Add cold heavy cream into a bowl.
- Whip using a mixer for 2–4 minutes.
- When soft peaks form, add:
- powdered sugar
- vanilla
- Whip until fluffy but not stiff.
👉 Don’t overwhip or it becomes butter-like.
🧁 Step 4: Combine for “Cloud Effect”
- Gently fold whipped cream into protein cream.
- Use a spatula and slow circular motion.
- Mix until light, airy, and mousse-like.
👉 This is your “protein cloud base.”
🍓 Step 5: Assemble the Cups
In each cup, layer like this:
Layer Order:
- Spoon of crushed granola (optional base)
- Protein cloud cream layer
- Berry layer
- Another spoon of cloud cream
- More berries on top
- Optional drizzle of honey
❄️ Step 6: Chill (VERY IMPORTANT)
- Place cups in fridge for 30–60 minutes
- This helps flavors blend and texture firm up
🍽️ Serving Style Ideas
- Top with mint leaves 🌿
- Add dark chocolate shavings 🍫
- Add chia seeds for extra fiber
- Add peanut butter drizzle for richness
- Serve in glass jars for aesthetic layers
💪 Nutrition Benefits (approx per serving)
- High protein (20–35g depending on powder)
- High calcium (Greek yogurt)
- Antioxidants (berries)
- Lower sugar than desserts
- Keeps you full longer
🔥 Pro Tips for Perfect Cloud Cups
✔ Use cold cream only for whipping
✔ Don’t overmix protein powder (prevents grainy texture)
✔ Add berries last so they stay fresh
✔ Chill longer for cheesecake-like texture
✔ Use vanilla protein for dessert flavor or berry protein for fruity twist
⚡ Variations
🍫 Chocolate Protein Cloud Cups
- Replace vanilla protein with chocolate protein
- Add cocoa powder (1 tbsp)
- Top with shaved dark chocolate
🥭 Tropical Version
- Replace berries with mango + pineapple
- Add coconut flakes
🥜 Peanut Butter Version
- Add 1 tbsp peanut butter into protein cream
- Top with crushed peanuts