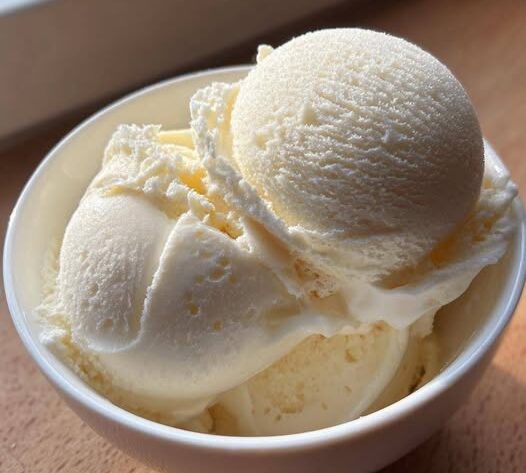
Vanilla Ice Cream (Classic Homemade Recipe)
Nothing compares to the rich, creamy taste of homemade vanilla ice cream. Made with simple ingredients and real vanilla, this dessert is smooth, luxurious, and packed with flavor. Whether served in a cone, alongside pie, or enjoyed on its own, this classic vanilla ice cream recipe is a timeless favorite.
Preparation Time
- Prep Time: 25 minutes
- Chilling Time: 4–12 hours
- Churning Time: 20–30 minutes
- Freezing Time: 4–6 hours
- Total Time: Approximately 9–18 hours
Yield
- Makes about 1.5 quarts (6–8 servings)
Ingredients
For the Ice Cream Base
- 2 cups heavy cream
- 2 cups whole milk
- ¾ cup granulated sugar
- 1 vanilla bean, split and scraped (or 2 tablespoons pure vanilla extract)
- 5 large egg yolks
- ¼ teaspoon fine salt
Optional Flavor Enhancers
- 1 tablespoon honey
- 1 tablespoon corn syrup
- 1 teaspoon vanilla bean paste
- Pinch of cinnamon
Equipment Needed
- Medium saucepan
- Mixing bowls
- Whisk
- Fine mesh strainer
- Ice bath
- Ice cream maker
- Freezer-safe container
- Rubber spatula
- Kitchen thermometer (recommended)
Step 1: Prepare the Vanilla Infusion
Pour the milk and heavy cream into a medium saucepan.
Add:
- Sugar
- Salt
- Vanilla bean seeds
- Vanilla pod
Place over medium heat and stir gently until the sugar dissolves completely.
Do not boil.
Heat until tiny bubbles form around the edges of the pan.
Remove from heat.
Cover and let steep for 30 minutes to allow the vanilla flavor to fully develop.
Step 2: Prepare the Egg Yolks
In a large mixing bowl:
Add the egg yolks.
Whisk continuously for 2–3 minutes until they become pale yellow and slightly thickened.
This creates the foundation of a rich French-style custard ice cream.
Step 3: Temper the Eggs
Slowly pour about one cup of the warm cream mixture into the egg yolks.
Whisk constantly while pouring.
This gradually raises the temperature of the eggs and prevents scrambling.
Continue adding another cup of warm mixture while whisking.
Once combined, pour the egg mixture back into the saucepan.
Step 4: Cook the Custard
Place the saucepan over medium-low heat.
Stir continuously using a wooden spoon or heatproof spatula.
Cook slowly until the mixture thickens enough to coat the back of a spoon.
Temperature should reach:
- 170–175°F (77–80°C)
Do not exceed 180°F (82°C), or the eggs may curdle.
The custard should look silky and smooth.
Step 5: Strain the Custard
Place a fine mesh strainer over a clean bowl.
Pour the hot custard through the strainer.
This removes:
- Vanilla pod pieces
- Any cooked egg particles
The result will be an exceptionally smooth ice cream base.
Step 6: Chill the Mixture
Prepare an ice bath:
- Fill a large bowl with ice.
- Add cold water.
Place the bowl containing the custard into the ice bath.
Stir occasionally until cooled.
Cover tightly.
Refrigerate for at least 4 hours.
For best results, chill overnight.
A thoroughly chilled base produces creamier ice cream.
Step 7: Churn the Ice Cream
Remove the chilled custard from the refrigerator.
If using vanilla extract instead of vanilla bean, stir it in now.
Pour the mixture into your ice cream maker.
Churn according to the manufacturer’s instructions.
Typically:
- 20–30 minutes
The mixture will transform into a thick, soft-serve consistency.
Step 8: Freeze Until Firm
Transfer the churned ice cream into a freezer-safe container.
Smooth the top using a spatula.
Press parchment paper or plastic wrap directly against the surface.
Seal tightly.
Freeze for:
- 4–6 hours
This allows the ice cream to firm up and develop the perfect scoopable texture.
Serving Suggestions
Serve in:
- Waffle cones
- Sugar cones
- Bowls
- Sundaes
Top with:
- Chocolate sauce
- Caramel sauce
- Fresh berries
- Roasted nuts
- Crushed cookies
- Brownie chunks
- Whipped cream
- Sprinkles
Tips for Extra Creamy Ice Cream
Use High-Fat Dairy
Heavy cream provides richness and smooth texture.
Chill Thoroughly
The colder the base, the better the churn.
Avoid Over-Churning
Over-churning can create a grainy texture.
Store Properly
Keep ice cream in an airtight container to prevent ice crystals.
Add a Small Amount of Honey
Honey lowers the freezing point and keeps ice cream softer.
Flavor Variations
Vanilla Bean Deluxe
Use two whole vanilla beans.
Honey Vanilla
Replace 2 tablespoons of sugar with honey.
Vanilla Almond
Add ½ teaspoon almond extract.
Cookies and Cream
Fold in crushed sandwich cookies after churning.
Chocolate Chip Vanilla
Add mini chocolate chips during the final minutes of churning.
Strawberry Vanilla
Mix in chopped fresh strawberries.
Caramel Swirl
Layer with thick caramel sauce before freezing.
Birthday Cake Vanilla
Add colorful sprinkles and cake pieces.
Troubleshooting
Ice Cream Too Hard
Allow it to sit at room temperature for 5–10 minutes before scooping.
Icy Texture
The base was not chilled enough or contained too much water.
Custard Curdled
The heat was too high during cooking.
Weak Vanilla Flavor
Use real vanilla bean or pure vanilla extract for best results.
Storage
- Store in an airtight container.
- Keep frozen at 0°F (-18°C) or below.
- Best enjoyed within 2 weeks.
- Safe to store for up to 1 month.
Nutritional Information (Approximate Per Serving)
- Calories: 320
- Protein: 5g
- Carbohydrates: 24g
- Fat: 23g
- Saturated Fat: 14g
- Cholesterol: 145mg
- Sugar: 22g
- Sodium: 80mg
Final Result
This homemade vanilla ice cream is exceptionally creamy, rich, and fragrant with real vanilla flavor. The custard base creates a luxurious texture that melts beautifully on the tongue, making it the perfect foundation for countless desserts or a delicious treat all on its own. Every scoop delivers smooth, velvety sweetness and classic vanilla goodness. 🍨✨