 admin1
 Some desserts are meant for special occasions, while others become recipes you find yourself making again and again. This high protein banana pudding easily falls into the second category. It has the smooth, creamy texture you expect from a classic banana pudding while offering a simple way to include more protein in your day. Whether you are preparing a quick afternoon snack, a light dessert after dinner, or something satisfying to enjoy after a workout, this recipe delivers plenty of flavor without requiring complicated techniques.
The base of this pudding is cottage cheese, which blends into an incredibly smooth mixture once processed in a high-speed blender. Even people who normally do not enjoy cottage cheese are often surprised by how creamy and rich it becomes. Once blended with vanilla protein powder, banana pudding mix, vanilla extract, and a little syrup, the result tastes much more like a traditional pudding than a protein snack.
One of my favorite things about this recipe is how quickly it comes together. There is no cooking on the stove, no waiting for pudding to set, and no long list of ingredients to prepare. Everything comes together in just a few minutes, making it perfect for busy weekdays when you want something homemade without spending much time in the kitchen.
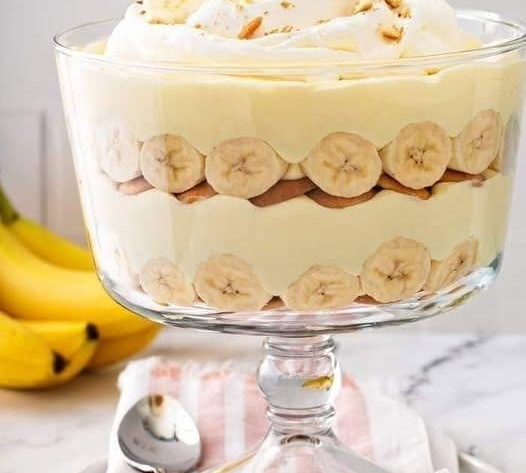
Although this pudding is simple, it still feels like a special dessert. Layering it with crushed wafers, whipped topping, and fresh banana slices creates a beautiful presentation while adding different textures in every spoonful. The creamy pudding, light whipped topping, crunchy wafers, and soft banana all work together to create a dessert that feels complete.
Why This Recipe Works So Well
- One reason this recipe is so reliable is the balance between flavor and texture. Cottage cheese creates a naturally thick base while the protein powder adds body and helps the pudding become even more filling. The banana pudding mix provides classic banana flavor, while vanilla extract adds warmth and depth without overpowering the other ingredients.
- The optional banana gives natural sweetness and fresh fruit flavor. If you decide not to include it, the pudding still has a pleasant banana taste from the pudding mix alone. Adjusting the amount of syrup also allows you to make the dessert sweeter or keep it lightly sweet depending on your preference.
- Milk is added only when needed. Since different brands of cottage cheese can vary in thickness, adding one tablespoon at a time gives you complete control over the final consistency. Some batches may need very little liquid while others benefit from an extra tablespoon or two.
Ingredients That Come Together Beautifully
- Each ingredient has a specific purpose, helping create the creamy texture and balanced flavor that makes this pudding enjoyable.
- Cottage cheese forms the foundation of the recipe. Both low-fat and full-fat versions work well, producing a thick, creamy mixture once blended until completely smooth.
- Vanilla protein powder adds protein while contributing a subtle vanilla flavor that complements the banana pudding mix.
- Banana pudding mix provides the signature taste that gives this dessert its familiar pudding flavor. Using a quality mix helps create a rich and consistent texture.
- Maple syrup or sugar-free syrup brings sweetness. The amount can easily be adjusted depending on personal taste while keeping the ingredient list exactly the same.
- Vanilla extract rounds out all the flavors and gives the pudding a homemade taste.
- Half of a banana is optional but adds fresh fruit flavor and natural sweetness. If you prefer not to include it, the pudding still remains creamy and delicious.
- Milk, whether dairy or plant-based, is only used if the mixture needs thinning after blending. Adding it gradually prevents the pudding from becoming too thin.
- The toppings complete the dessert. Crushed wafers provide a satisfying crunch, whipped topping creates a light and fluffy finish, and banana slices add freshness along with a classic presentation.
Preparing the Ingredients
- Before blending, it helps to measure every ingredient and have everything ready. Since this recipe comes together quickly, having the ingredients prepared makes the entire process smooth and efficient.
- Allow refrigerated ingredients to sit at room temperature for several minutes before blending. This small step often helps the ingredients combine more easily, resulting in a smoother pudding.
- If using the optional banana, slice it just before blending to maintain its fresh flavor and color. Crush the wafers while the blender is running so they are ready when it is time to assemble the dessert.
- Choosing serving glasses before you begin also makes layering much easier. Clear glasses or dessert jars show off each beautiful layer, making the finished pudding look just as inviting as it tastes.
Creating the Smooth Pudding Base
- The secret to this recipe is blending the cottage cheese until completely smooth before adding the remaining ingredients. This extra step transforms the texture, removing the small curds and creating a silky base that resembles traditional pudding.
- Once the cottage cheese reaches a smooth consistency, add the vanilla protein powder, banana pudding mix, maple or sugar-free syrup, vanilla extract, the optional banana, and blend everything again until fully incorporated. If the mixture appears thicker than you would like, slowly add milk one tablespoon at a time while blending until the pudding reaches your preferred consistency.
- The finished pudding should be creamy, smooth, and easy to spoon without being runny. At this stage, the mixture is ready to enjoy on its own, but layering it with the toppings creates an even more satisfying dessert that feels both homemade and thoughtfully prepared.
Assembling the Banana Pudding
- Once the pudding base is smooth and creamy, it is time to build the dessert. This is where a few simple ingredients come together to create layers of flavor and texture. Even though the process is easy, taking a little care while assembling the pudding makes the finished dessert look inviting and feel more like a homemade treat.
- Start by placing a layer of crushed wafers into the bottom of each serving glass. The wafers provide a light crunch and absorb a little moisture from the pudding as it chills, creating the familiar texture found in traditional banana pudding. They also add a buttery flavor that pairs perfectly with the creamy filling.
- Next, spoon a small amount of whipped topping over the crushed wafers. This creates a light layer between the crunchy base and the rich pudding. After that, add a generous spoonful of the blended banana pudding mixture.
- Repeat the same layers once more. Another layer of crushed wafers, followed by whipped topping and more pudding, gives each serving a beautiful appearance while ensuring every bite contains a little bit of everything. Finish each pudding cup with another swirl or spoonful of whipped topping, a sprinkle of crushed wafers, and an optional banana slice placed on top for a fresh finish.
- Using clear glasses or small dessert jars allows the layers to be visible, making the pudding look attractive without requiring any extra decoration.
Let the Flavors Develop
Although this pudding can be enjoyed immediately after assembling, allowing it to chill in the refrigerator makes a noticeable difference. As it rests, the flavors blend together and the pudding becomes even creamier.
The wafers soften slightly without losing all of their texture, creating the familiar consistency that makes banana pudding so enjoyable. The vanilla, banana flavor, and sweetness become more balanced after a few hours of chilling.
If time allows, prepare the pudding several hours before serving or even the night before. The overnight rest gives the dessert a richer flavor and a smoother texture, making it taste even better the next day.
Serve the pudding cold straight from the refrigerator. Its cool, creamy texture makes it especially refreshing during warm weather, but it is equally satisfying throughout the year.
Tips for the Smoothest Texture
The texture of this pudding depends almost entirely on how well the ingredients are blended. Cottage cheese naturally contains small curds, and blending thoroughly is what transforms them into a silky, pudding-like consistency.
A high-speed blender produces the smoothest results because it completely breaks down the cottage cheese. If the mixture is not blended long enough, tiny bits of cottage cheese may remain, which changes the final texture.
It also helps to blend in stages. Begin with only the cottage cheese until it is perfectly smooth. Once that is achieved, add the remaining ingredients and blend again until everything is fully incorporated. This simple method creates a much creamier pudding than blending everything together at once.
If the pudding seems thicker than expected, avoid adding too much milk at one time. Instead, add a single tablespoon, blend, and check the consistency before deciding if more is needed. This prevents the mixture from becoming too thin.
Easy Ways to Customize
- One of the nicest things about this recipe is how flexible it is while keeping the same basic preparation method.
- For a lower-carb version, simply leave out the optional banana, replace the regular wafers with low-carb wafers, and use sugar-free syrup instead of maple syrup. These small adjustments reduce the carbohydrate content while maintaining the creamy texture and familiar flavor.
- If you need the recipe to be gluten-free, use gluten-free wafer-style cookies or graham-style crackers in place of traditional wafers. Everything else can remain the same, making this an easy adjustment for those avoiding gluten.
- For a dairy-free version, substitute your preferred dairy-free yogurt for the cottage cheese. Use dairy-free milk whenever thinning is needed, replace the whipped topping with a dairy-free alternative, and choose gluten-free dairy-free wafers if required. These substitutions allow the dessert to remain creamy while fitting different dietary needs.
Storing Leftovers
- If you have extra pudding, transfer it to an airtight container or cover the serving glasses tightly before placing them in the refrigerator.
- The pudding stays fresh for about three to four days when properly refrigerated. During storage, a small amount of liquid may naturally separate from the mixture. This is completely normal. Simply stir the pudding gently before serving to restore its smooth consistency.
- For the freshest presentation, add any fresh banana slices immediately before serving. This helps prevent them from browning during storage.
Serving Ideas
- This pudding is delicious on its own, but it can also be served in several different ways depending on the occasion.
- For individual desserts, layer the pudding into small glasses or mason jars. These are perfect for parties, family dinners, or meal prep because each serving is already portioned.
- For a simple family-style dessert, prepare the pudding in one larger serving dish instead of individual cups. Spoon portions into bowls just before serving and garnish each one with whipped topping, crushed wafers, and banana slices.
- If you’re preparing snacks ahead of time, divide the pudding into small containers with lids. Keep the toppings separate until you’re ready to eat so the wafers stay crisp
Description
- This High Protein Banana Pudding is a smooth, creamy, and satisfying no-cook dessert that comes together in just minutes. Blended cottage cheese creates a rich pudding base without any noticeable curds, while vanilla protein powder and banana pudding mix give it classic banana pudding flavor with an extra protein boost. Layered with whipped topping, crushed wafers, and optional banana slices, this easy dessert is perfect for a healthy snack, post-workout treat, or light dessert. It can also be adapted for low-carb, gluten-free, or dairy-free diets with simple ingredient substitutions.
Recipe Details
Prep Time: 10 minutes
Cook Time: 0 minutes
Total Time: 10 minutes
Servings: 2
Ingredients
For the Pudding
- 2 cups cottage cheese
- 1/4 cup vanilla protein powder
- 2½ tablespoons banana pudding mix
- 1–2 tablespoons maple syrup or sugar-free syrup
- 1 teaspoon vanilla extract
- 1/2 banana (optional; omit for a low-carb version)
- 1–2 tablespoons milk (regular or plant-based), as needed to thin the mixture
For the Topping
- 2 tablespoons crushed wafers
- 1/4 cup whipped topping
- Banana slices, optional
Instructions
- Blend the Cottage Cheese
- Add the cottage cheese to a high-speed blender. Blend until completely smooth and creamy with no visible curds remaining.
- Add the Remaining Ingredients
- Add the vanilla protein powder, banana pudding mix, maple syrup or sugar-free syrup, vanilla extract, and the optional half banana. Blend again until the mixture is silky smooth.
- If the pudding seems too thick, blend in the milk one tablespoon at a time until it reaches your preferred consistenc
- Assemble the Pudding
- Divide the crushed wafers between two serving glasses, creating the first layer.
- Add a spoonful of whipped topping over the wafers, followed by a layer of the banana pudding mixture.
- Repeat the layers until the glasses are filled.
- Finish each serving with the remaining whipped topping, a sprinkle of crushed wafers, and an optional banana slice.
- Chill and Serve
- Serve immediately if desired, or refrigerate for several hours for an even creamier texture and richer flavor. The pudding is especially delicious after chilling overnight.
Dietary Variations
Low-Carb
- Omit the banana.
- Use sugar-free syrup instead of maple syrup.
- Replace regular wafers with low-carb wafers.
- Omit the whipped topping if preferred.
Gluten-Free
- Replace regular wafers with gluten-free wafer cookies or graham-style crackers.
Dairy-Free
- Substitute dairy-free yogurt for the cottage cheese.
- Use dairy-free milk.
- Replace the whipped topping with a dairy-free alternative.
- Use dairy-free gluten-free wafers if needed.
Storage
- Store the pudding in an airtight container or cover individual serving glasses tightly.
- Refrigerate for 3 to 4 days.
- Stir gently before serving if any liquid separates during storage.
- For the freshest presentation, add banana slices just before serving.
Nutrition (Per Serving)
- Calories: 286
- Protein: 40g
- Carbohydrates: 8g
- Fat: 5g
- Saturated Fat: 3g
- Polyunsaturated Fat: 0.1g
- Monounsaturated Fat: 1g
- Cholesterol: 46mg
- Sodium: 1081mg
- Potassium: 282mg
- Sugar: 7g
- Vitamin A: 100 IU
- Calcium: 237mg
- Iron: 0.3mg